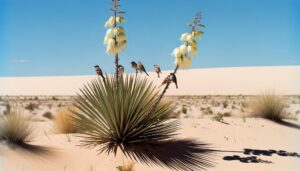
3 Steps to Draw a House Sparrow in a Tree
To draw a house sparrow in a tree, first observe its stout body, patterned coat, and sharp beak. One starts by sketching the tree, adding branches and leaves for realism.
They then delineate the sparrow's round head, plump body, and short tail. Noticing small details, like the bird's unique markings, adds authenticity to their sketch.
Gentle shading and calculated strokes lend depth and texture to the tree and bird. Adding the thoughtful final touches transforms simple sketches into vivid art.
With practice and feedback, they'll further refine their artistic skills and capture the sparrow's essence with even greater finesse.
Key Takeaways
- Begin by lightly sketching the tree's trunk and branches, adding texture to portray the bark's ruggedness.
- Sketch the house sparrow's small, stout body, round head, and short tail, detailing distinctive markings on the head and wings.
- Use shading and highlighting techniques to give the drawing a 3D effect, considering the direction and intensity of light.
- Render the texture of the bird's feathers and the tree's bark with detailed strokes for added realism.
- Continually practice and seek feedback to improve your drawing skills, experimenting with different mediums like charcoal or watercolor.
Understanding Your Subject Matter
Before delving into the drawing process, it's essential to familiarize yourself with the intricate details and peculiarities of your subject – a house sparrow perched in a tree – to capture its essence authentically and artistically.
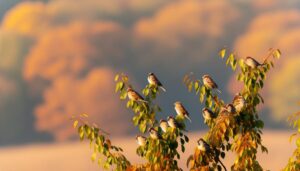
Observe its petite, stout body, its patterned coat of brown, black, and white feathers, and its sharp, pointed beak, ideal for pecking at seeds. Note the distinctive black bib adorning its chest, a signature trait of the male species. Pay attention to the way it perches on a branch, its tiny claws gripping the bark.
The tree itself, with its gnarled branches and textured surface, is a worthy subject too. Try to appreciate the sparrow's lively nature, the way it flits from branch to branch, its voice a symphony of chirps and tweets.
Gathering Your Drawing Materials
Before an artist begins to etch the likeness of the house sparrow on paper, they must first assemble their arsenal of tools. Each stroke, each line, will be influenced by the choice of art supplies, from the softness of the pencil to the weight of the paper.
Understanding drawing techniques and the effect different materials have on them is essential in capturing the delicate details of the sparrow and the robust texture of the tree.
Choosing Suitable Art Supplies
To bring a house sparrow to life on paper, one must carefully select a set of high-quality drawing materials that can capture the bird's delicate features and vibrant personality. One needs a versatile range of graphite pencils, from hard (H) grades for light, intricate detail, to softer (B) grades for bold, dark lines.
A high-quality eraser is essential for correcting mistakes and creating highlights, while a blending stump helps to achieve smooth textures and gradients. Good quality drawing paper, preferably medium-texture, is also necessary, as it can withstand repeated erasing and shading.
Understanding Drawing Techniques
Once you've gathered your selection of fine art supplies, grasping an understanding of various drawing techniques that will bring your house sparrow to life is crucial.
Mastery of these techniques will transform your blank canvas into an avian paradise. Start with the basics: light sketching. This allows you to outline the sparrow's form without committing to solid lines.
Next, focus on shading techniques to add depth and texture. The bark of the tree, the feathers of the sparrow – all require different shading styles.
Remember, the devil is in the details. The intricate patterns on the sparrow's feathers, the knotted wood of the tree – these are what bring your drawing to life.
Lastly, remember the importance of patience and practice. Artistic growth takes time and perseverance.
Sketching the Basic Tree Structure
Let's imagine a sturdy tree with robust branches reaching out like welcoming arms, providing the perfect perch for our House Sparrow. Begin by sketching the tree's trunk, the central pillar of strength. It doesn't need to be a straight line; real trees have a unique, imperfect charm. Lightly indicate its width and height, and don't worry about making it too detailed at this point.
Next, lightly draw the primary branches. Remember, they're an extension of the tree's trunk, so they should flow organically from it. These branches will hold smaller, secondary branches, creating a complex network that forms the tree's canopy. It's okay if it looks a bit messy now; trees are wonderfully chaotic in their structure.
This is just the basic structure, the skeleton that our House Sparrow will call home.
Adding Details to the Tree
Breathing life into the sketched tree, start adding texture to the trunk and branches, capturing the rough and rugged bark, which is the fingerprint of the tree's age and history. Use a variety of pencil strokes, such as cross-hatching, to mimic the natural pattern and depth of the bark.
Next, turn focus to the leaves. They're not just green blobs but a mosaic of individual shapes and shades. Try to sketch clusters of leaves rather than each leaf. Pay attention to the way they overlap, creating shadows and depth.
Don't forget the smallest details. Add knots in the bark, branches stabbing out at odd angles, and the subtle curve of the tree trunk. These minute details will add realism, transforming your sketch into an artful representation of nature.
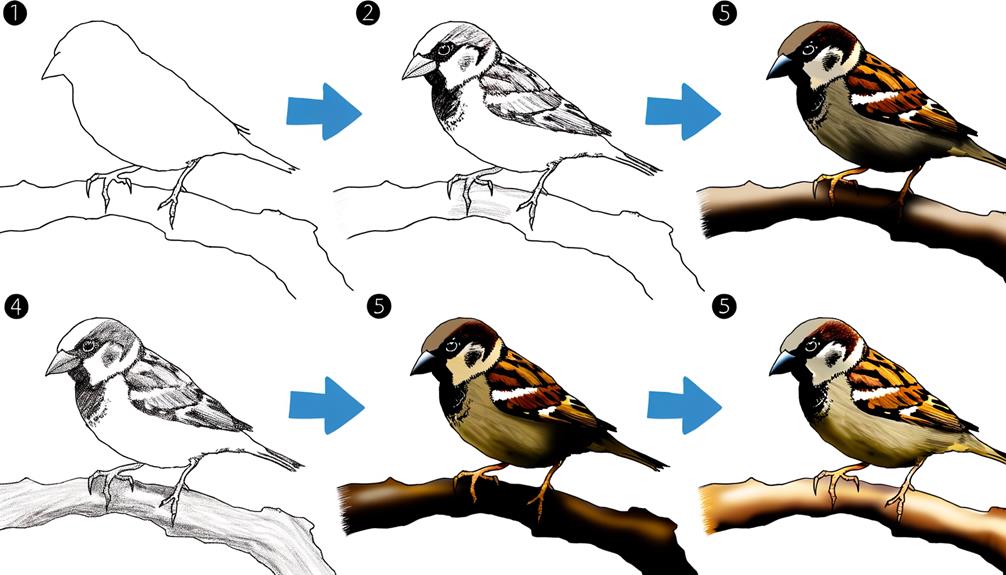
Outlining the House Sparrow
Now, let's turn our focus to the star of our sketch, the house sparrow.
We'll begin by crafting the basic shape, capturing the essence of the sparrow's small, plump, yet agile form.
Then, we'll add depth to our drawing by detailing the sparrow's features and intricately replicating the unique texture of its feathers.
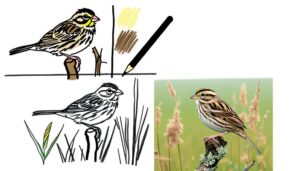
Sparrow's Basic Shape
With a discerning eye for detail, one can start outlining the house sparrow by sketching a small, plump body, a short tail, and a stout beak, capturing the bird's quintessential charm and energy.
The body is almost oval, but with a slight taper towards the tail. The tail itself isn't very long, proportionate to the body, ending in a gentle point.
The beak, an essential element of the sparrow's identity, is short and robust, resembling a tiny cone. The head is round, merging smoothly into the body, giving the bird its characteristic compact look.
The wings sit low on the body, and when folded, are nearly hidden by the bird's fluffy plumage. It's these specifics that bring the sketch to life, accurately representing the sparrow's basic form.
Detailing Sparrow's Features
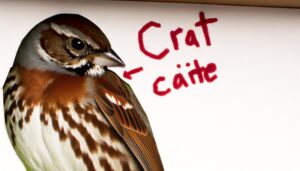
After mastering the bird's basic form, one can explore the intriguing details of the house sparrow's features. Starting with the distinctive markings on its head and wings, a keen observer will notice a gray crown paired with chestnut-brown nape and back. Cheek patches, white in color, starkly contrast the black bib under the chin, a key identifier of the male bird.
The wings, adorned with multiple shades of brown, boast a white wing bar that's easily visible when the bird is in flight or perched. The tail's shorter length, compared to other sparrows, is also worth noting.
Careful observation and translation of these intricate details onto paper will lead to a more life-like and accurate portrayal of the house sparrow.
Sparrow's Feather Texture
Having captured the unique identifiers and colors of the house sparrow, it's time to bring added realism by illustrating the texture of the bird's feathers.
Each feather is a work of art in itself, a mosaic of soft barbs intricately woven together. The sparrow's feathers aren't just flat colors; they're a symphony of gradient hues, blending from soft beige to a rustic brown.
The texture is further emphasized by the fine lines running through each feather, giving it depth and dimension. An artist must carefully observe these patterns, rendering the soft fluffiness of the under-feathers and the stiff, streamlined structure of the flight feathers.
Perfecting the Sparrow's Details
Delving into the details, one can't help but notice the intricacy and elegance of a sparrow's features, from its delicate beak to its feathery coat.
The beak, a finely chiseled instrument, should be drawn with a subtle curve, true to its shape. It's an essential tool for the bird, used for feeding and nesting, so it deserves careful attention.
The eyes, like tiny beads, are expressive and full of life. They should reflect innocence, curiosity, and alertness.
The feathers, seen up close, are a marvel of soft texture and subtle color variations. Capturing these nuances can make the sparrow appear more lifelike.
Lastly, don't overlook the feet. They're small, but the intricate claw structure adds to the sparrow's realism.
Shading and Highlighting Techniques
With an artist's keen eye, you'll master the use of shading and highlighting, techniques that breathe life into your sparrow and give it a three-dimensional feel.
Begin by observing real sparrows and noting where light hits their bodies, creating bright spots, and where shadows fall, forming depth.
Shading isn't a random process, but a calculated one. Use a blend of soft and hard strokes to mimic the bird's texture. When shading, consider the direction and intensity of light, paying attention to the body's contours.
Highlights, on the other hand, define the bird's form and provide a sense of volume. You'll strategically place these on areas that light naturally illuminates.
Together, these techniques will add realism and depth to your sparrow.
Finalizing Your Artwork
After all the meticulous shading and highlighting, it's time to put the finishing touches on your sparrow masterpiece. It's these final strokes that transform your work from a simple sketch to a vibrant illustration.
To assist you in this process, consider the following table, detailing steps and techniques for finalizing your artwork.
| Step | Technique |
|---|---|
| 1 | Add depth with color. Use varied hues to bring your drawing to life. |
| 2 | Create texture. Use small, detailed strokes to suggest feathers and bark. |
| 3 | Enhance light and shadow. Enhance the contrast to give your artwork a 3D effect. |
Tips for Continuous Improvement
While mastering the art of drawing a house sparrow nestled in a tree takes time and practice, there are a few key strategies that can keep your skills evolving and your artwork improving.
To begin with, it's important to consistently practice. Like a musician honing their craft, an artist's hand grows surer and more accurate with each sketch.
Next, don't shy away from critique. Feedback, whether from peers, mentors or online art communities, can offer invaluable insights and perspectives.
Lastly, consider experimenting with different mediums. The delicate feather patterns of a sparrow might be striking in charcoal, soft in watercolor, or bold in oil pastels. Each medium brings its own unique texture and mood to your artwork, opening up new creative possibilities.
Conclusion
After dedicating time to understand the house sparrow, gathering materials, sketching, detailing, outlining, and shading, the masterpiece emerges. Ironically, it's not the meticulously drawn sparrow that captures attention but the detailed tree it's perched on.
It's a showcase of the beauty of nature – the star isn't always the creature, but the habitat it calls home. Therefore, while learning to draw a house sparrow, artists end up perfecting their tree drawing skills.
An unintended, yet artistically rewarding outcome.